Introducing TinyMultiBootLoaderPlus
What is TinyMultiBootLoaderPlus?
It is a bootloader for microcontrollers
A Bootloader is a firmware running in the PIC device which allows the user to send it’s own firmware without the need of a programmer.
TinyMultiBootLoaderPlus Bootloader is
Firmwares for many microcontrollers including PICs and AVR devices. This microconroller firmware is needed to be send to the microcontroler flash memory with a programmer, only once.
a PC software which communicates, via serial connection (only, except for PIC32 for which an USB firmware exists), with the bootloader firmware in the microcontroler device and send it the user’s program.
Features of the firmware
Size of only 100 words; (all versions, for 16F,18F,dsPIC occupy less than 100 words); Can write flash, eeprom and configuration bytes(18F); On reset, waits 1 second (adjustable) for a message from the PC, if not received, launch user application; The .asm file can be easily modified and adapted for any frequency (or baudrate);
Features of the PC software
Can upload programs into flash (in current version eeprom and cfg bytes can be modified only manually, depending on the device type); Works with PIC16F,PIC18F and dsPIC types; automatically detects HEX content and PIC model; Remembers last settings; In case of errors, performs retransmissions or tries to resynchronize with pic; The communication settings are editable so you can write any COM number or desired baud; If a filename is specified as a command line parameter, it will automatically try to write it;
Development program
This bootloader is based on the original works by "Tiny PIC Bootloader" see http://www.etc.ugal.ro/cchiculita/software/picbootloader.htm by Claudiu Chiculita. We thank his great works.
The Windows Operating System software is based on "Tiny Pic Bootloader for GNU/Linux" writen in python by Ferezvi and has been ported to Visual Studio.
TinyMultiBootLoaderPlus capabilities
TinyMultiBootLoaderPlus supports the following microconrtollers: Atmel: ATtiny ATmega NXP ARM Cortex-M0+ Microchip: PIC10 PIC12 PIC16 PIC18 PIC24 dsPIC30 dsPIC33 PIC32
And:
with light modifications to the Bootloader firmware for new devices without having to modify something: neither your code, nor the linker script, nor remap reset/interrupts vectors to new locations, etc… via GUI or command line with automatic Reset on RTS serial pin with autodetect of the right COM port and baud rate (only if automatic Reset on RTS serial pin is enabled and correctly connected to PIC device) with HEX code verification to avoid to send a program from a different device family in your PIC (for example: prevent to program a PIC16 ".hex" in a PIC18 device) with debug messages capabilities
Licencing
This software is under "Creative Commons Attribution Non-Commercial License": you can use it at home for free you can use it at work for free you can share it for free, but this licence must remain the same you can modify it as you want, but this licence must remain the same you CAN’T sell it, even if you have modified it
Changes
Formal Release of v0.12.5
| Reference | Time Stamp |
|---|---|
ASCIIDOCs rendered |
2020-09-23 |
Master ToC information |
2020-09-23 |
Changes in this release
2020/9/20: release of TinyMultiBootLoaderPlus+ (v0.12.x)
Development team now lead by Evan R. Venn - Anobium
SourceForge now include source for version 12
SourceForge updated to include downloads for Firmware and a PC Application
2018/03/27: release of TinyMultiBootLoaderPlus+ (v0.12.5)
Development team now includes Evan R. Venn - Anobium
SourceForge updated to include source for version 1
SourceForge updated to include downloads for Firmware and a PC Application
Release of Tiny_Avr-Pic_Bootloader+ (v0.12.x)
Updated User interface - huge changes to remove typos and languge issues
Updated User interface  for useability
Updated to include support for USB
2016/05/22: release of Tiny_Avr-Pic_Bootloader+ (v0.11.0)
Docs / Web site:
in "Tested compilers: PIC" page:
"Microchip C18" added
"Microchip XC8" moddified
"JALv2" moddified
2015/02/24: Tiny AVR/PIC Bootloader+ is now Tiny Multi Bootloader+ release of Tiny_Avr-Pic_Bootloader+ (v0.10.0) Docs / Web site:
Tested compilers: TI page added
Tested devices: TI page added
TI MPS430 page added
Tested compilers: 8051 page added
Tested devices: 8051 page added
Silicon Labs C8051 page added
Tested compilers: Microchip PIC page modified: SourceBoost - BoostC compiler added
Using PC software page modified: upsate of the command line documentation
Tested Devices: Microchip PIC page modified: added note from Dan posted on 2014.02.06 (http://sourceforge.net/p/tinypicbootload/discussion/general/thread/f759f79b/)
Tested Devices: Microchip PIC updated: added new devices
Firmwares: Microchip PIC10, PIC12, PIC16 pages modified: Loading firmware from PC app, wo/ changing RESET vector section added (http://sourceforge.net/p/tinypicbootload/discussion/help/thread/645cfea2/) (Dan)
Firmwares: Microchip PIC10, PIC12, PIC16, PIC18, PIC18J pages modified: how to generate absolute code (and not relocatable code) for modified bootloaders (Dan)
Changed screenshots
2014/07/03: Release of Tiny_Avr-Pic_Bootloader+ (v0.9.0)
Docs / Web site -  Web site now uses frames
Tested compilers: NXP ARM page added
Tested devices: NXP ARM page added
PIC18J page added
Microchip 16-bit PIC MCU page added
PIC24 page's name modified to Type D
dsPIC page's name modified to Type E
NXP ARM Cortex-M0 page added
About page modified
description of data transfer formats (from Dan) added in PIC10, PIC12, PIC16, PIC18, PIC18J, 16-bit PIC TypeD and Type E pages
difference between D and E type explained (from Dan) in Microchip 16-bit PIC MCU page
Tested Devices: PIC updated.
2014/02/22: Eelease of Tiny_Avr-Pic_Bootloader+ (v0.8.3.1)
Docs / Web site:
About page modified.
PIC18F1330 device added to Tested Devices: PIC page.
In Firmwares: PIC32 page, use of USB firmware explained.
Tested Devices: PIC updated.
Tested Compilers: PIC updated.
2013/12/31:
release of Tiny_Avr-Pic_Bootloader+ (v0.8.3)
Docs / Web site:
Added in the Tested PIC Compilers page, JALv2 tips to get it works with TinyBootloader+ (from Sunish).
Added in the Tested PIC Compilers page, PIC18 assembler tips to get it works with TinyBootloader+ (from Dan).
2013/10/09:
release of Tiny_Avr-Pic_Bootloader+ (v0.8.2)
2013/09/17:
release of Tiny_Avr-Pic_Bootloader+ (v0.8.1)
2013/07/31:
release of Tiny_Avr-Pic_Bootloader+ (v0.8.0)
2013/07/20:
release of Tiny_Avr-Pic_Bootloader+ (v0.7.1)
2013/07/18:
release of Tiny_Avr-Pic_Bootloader+ (v0.7.0.2)
2013/07/12:
release of Tiny_Avr-Pic_Bootloader+ (v0.7.0.1)
2013/07/06:
Tiny Pic Bootloader+ is now Tiny AVR/PIC Bootloader+
release of Tiny_Avr-Pic_Bootloader+ (v0.7.0)
Docs / Web site:
Added Tested devices: AVR page.
Added Firmwares: modify for ATtiny page.
2013/05/31:
release of TinyPicBootloader+ (v0.6.5.1)
2013/05/16:
release of TinyPicBootloader+ (v0.6.5)
Docs / Web site:
Tested devices page updated.
2013/05/08:
release of TinyPicBootloader+ (v0.6.4)
Docs / Web site:
changed web site layout.
Quickstart page complete.
2013-04-16:
release of TinyPicBootloader+ (v0.6.3.1)
Docs / Web site:
Hardware Connections page complete.
2013-04-12:
release of TinyPicBootloader+ (v0.6.3)
2013-04-10:
release of TinyPicBootloader+ (v0.6.2.1)
2013-04-10:
release of TinyPicBootloader+ (v0.6.2)
2013-02-03:
release of TinyPicBootloader+ (v0.6.1)
2013-02-02:
Website layout created
Forum created
2013-01-31: First public release of TinyPicBootloader+ (v0.6)
Quick Start
Introduction:
This introduction covers two aspects - making the microcontroller work with a bootloader, and, transferring the user program to the microcontroller.
Making the microcontroller work with a bootloader
You must transfer the bootloader firmware in your target microcontroller with an external programmer (i.e. Pickit programmers, etc…). This has to be done once.
Simply take the hex file and program with the selected programmer.
If the bootloader firmware for your target microcontroller is not shown in the supported
isn’t in "Tiny AVR/PIC Bootloader+" archive or you want to use a different Baud Rate and/or UART port, you must modify a firmware from a device close to yours (read "[Firmwares:] modify for xxxxx" web pages howto). Connect PIC board to PC: Now you can connect your AVR or PIC board to your PC (read the "Hardware Connections" web page).
Minimal connections are: RX pin from PC → TX pin on AVR or PIC. TX pin from PC → RX pin on AVR or PIC. GND pin from PC → GND pin on AVR or VSS pin on PIC. for optionnal auto-reset: !RTS pin from PC → !RESET pin on AVR or !MCLR pin on PIC Note: for the bootloader to work properly, the AVR or PIC must be running (device powered and quartz connected (or internal oscillator correctly configured))!!! Create your application ".hex" file: Most of the time, you will develop your application firmware as usual, without having to modify something: neither your code, nor the linker script, nor remap reset/interrupts vectors to new locations, etc.
The "Tested Compilers: xxxxx" web page lists tested compilers for different AVR / PIC families with eventual tips to get your code working with "Tiny AVR/PIC Bootloader+".
Transferring the user program to the microcontroller:
The easiest way to use "Tiny AVR/PIC Bootloader+" is to leave all options as default and only change the PC’s COM (select the one connected to the AVR or PIC board) and the Baud Rate (select it depending of the bootloader firmware configuration, see "[Firmwares:] modify for xxxxx" web pages). Check list: - the AVR or PIC was programmed with the right bootloader firmware? - the AVR or PIC is correctly connected to the PC? - the AVR or PIC is powered? - the right COM port is selected in "Tiny AVR/PIC Bootloader+"? - the right Baud Rate is selected in "Tiny AVR/PIC Bootloader+"? If previous checks are OK, then click on the [Check Device] button: They are two possibilities: "Found: xxxxx" is shown in the message tab. Everything is OK, then read "Transfert file" below. "Error: No Device detected!!!" is shown in the message tab. It means that optionnal software reset isn’t used (!RTS pin from PC isn’t connected to !MCLR pin on PIC (see "Hardware Connections" web page)). Then click the [Check Device] button again and when "Check Device…" is shown in the message tab, manually reset the AVR or PIC device (it must be done before "Error: No Device detected!!!" appears, you have ~5 seconds): "Found: xxxxx" is shown in the message tab. Everything is OK, then read "Transfert file" below. "Error: No Device detected!!!" is shown in the message tab. Then you have a problem… Double check everything! If it still doesn’t work you can ask for help in the forum. Transfert file: Click on the [Browse] button and select your application’s ".hex" file, then click on [Write Flash]. After a few messages, you should have "Transfert successfull :-)". Well done!
Bootloader Primer
A Bootloader
-
is a special program that runs before any user program is executed.
-
is programmed into a microcontroller and communicates with the computer usually through the serial interface to support the transfer of the user program.
-
receives a user program via a loading process from the source computer and writes the user program in the flash memory, then launches this user program for execution.
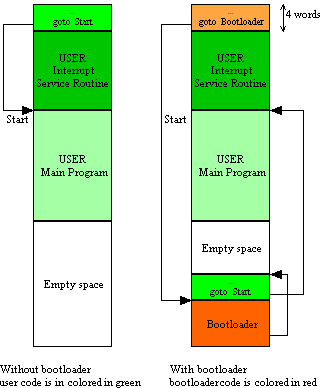
There are two types of bootloaders, some that require that the user to locate the user program to fit above the bootloader, and the second approach where the reallocation of the user program if completed by the bootloader loading process where the first 4 instructions of the user program are adapted to goto the bootloader program memory address.
With both type of bootloader once the bootloader has terminaed the bootloader exits and pass control to the user program.
TinyMultiBootLoaderPlus
TinyMultiBootLoaderPlus uses the second type. TinyMultiBootLoaderPlus essentially it located in the highest memory location and is execture via a GOTO statement within the first four words of the microcontroller. When a user program is loaded via the loading process, the user program is adapted as follows:
-
The first four instructions of the source user program are programmed into the memory four instructions below the bootloader.
-
The first four instructions of the source user program are replaced with instructions to GOTO to the bootloader memory location.
-
Then, the remainder of the source user program remains the same.
The diagram below shows the method. The left hand diagram shows the source user program. The right hand diagram shows the bootloaders' GOTO and the Bootloader (in red), the user program is the loaded (in green)
Bootloader Constraints
Bootloaders can only be used with those microcontrollers that can write to flash memory through software.
The bootloader itself must be written into the flash memory with an external programmer.
In order for the bootloader to be launched after each reset, a "goto bootloader" instruction must exist in the first 4 instructions.
These Constraints apply to the TinyMultiBootLoaderPlus bootloader.
Connectivity
Introduction:
This introduction covers
Software
Introduction:
This introduction covers
Windows Software
Introduction:
This introduction covers
Linux Software Support
Introduction:
This introduction covers
Support
Introduction:
This introduction covers
Firmware
Introduction:
This introduction covers
SiliconLabsC8051
Introduction:
This introduction covers
Atmel ATtiny
Introduction:
This introduction covers
End of page
Atmel ATMega
Introduction:
This introduction covers
Arduino
Introduction:
This introduction covers
Microchip PIC10
Introduction:
This introduction covers
Microchip PIC12
Introduction:
This introduction covers
Microchip PIC16
Introduction:
This introduction covers
Microchip PIC18
Introduction:
This introduction covers
Microchip PIC18J
Introduction:
This introduction covers
Microchip PIC 16bit
Introduction:
This introduction covers
Microchip PIC32
Introduction:
This introduction covers
NXPARMCortex-M0
Introduction:
This introduction covers
TIMSP430
Introduction:
This introduction covers
TinyMultiBootLoaderPlus Maintenance
This is the maintenance section of the Help file. Please refer the sub-sections for details using the contents/folder view.
Maintenance
Introduction:
These insights are not distribution specific.
Solution Architecture: These components are key for a complete solution:
-
installer
-
ini files
-
Help